Sunday, May 30, 2010

Today's Little Bit of Awesome

It's the little things in life and all, right? Well my mother sent me a package in the mail with various stuff in it that I needed for my computer, and right along with all the techy pieces was this:


Yes, that's right folks.  My mom sent me a package of Gummy Vitamins.   Because she knows the regular multi-vitamins make me wanna puke.  They're even gluten-free! I <3 my mommy.

Friday, May 28, 2010

Picassa kicks it!

I have decided after much trial-and-error that my favorite photo-editing program is Picassa from Google.  I'd love to have photoshop, but I don't have $500 bucks, and Picassa does almost everything I want it to.

Behold: Itty Bitty Girly Shoes, black & white except for the shoes.

Click image to enlarge
Three hours, five photo-editing softwares, and this is what you get! I <3 those toes!

Wednesday, May 26, 2010

Thrifty Finds Thursday...early

I was at a Goodwill in Sioux City when I found this charming windchime.  For $1.  Yay!


Here's the top (mama owl):


And the bottom (baby owls):


It's kinda beat up.  It looks rusty, but it's not. The colors kind of swirl.  The strings attaching the baby birds to the mama bird are ratty and look like they're on their last leg.  And the sound it all makes when the wind blows isn't that great.  But they're so pretty that I don't mind!

Monday, May 24, 2010

Itty Bitty Girly Shoes

I'm really into photography.  It's one of my passions.  This weekend I was watching the little girl of a friend and taking pictures of her while she played with sidewalk chalk.  This one is one of my favorites.


Here it is in black & white, which I think I like even better:


Friday, May 21, 2010

Birthday Girl! Plush Cube Tutorial

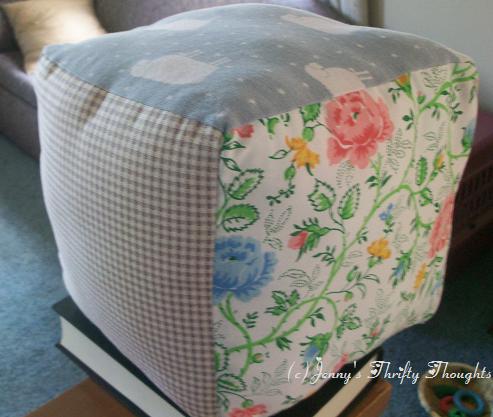
Birthday Girl! Plush Cube:


One of my friends' kids is turning one, and her birthday is tomorrow.  Rather than go and buy something, I thought I'd whip something up.  Inspiration hit me in the shower, and this is what came of it.  This is my first official tutorial, so go easy on me!

Supplies:

  • 9x9 fabric scraps (7 varieties)
  • Thread
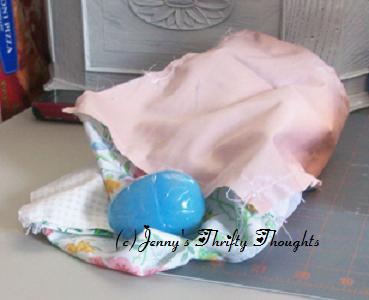
  • Easter egg (or other plastic container)
  • Noisemaker (ex: bells, etc)
  • Stuffing/fiberfill
Time: This took me 2 hours, but I bet you could do it in less.


Tutorial 

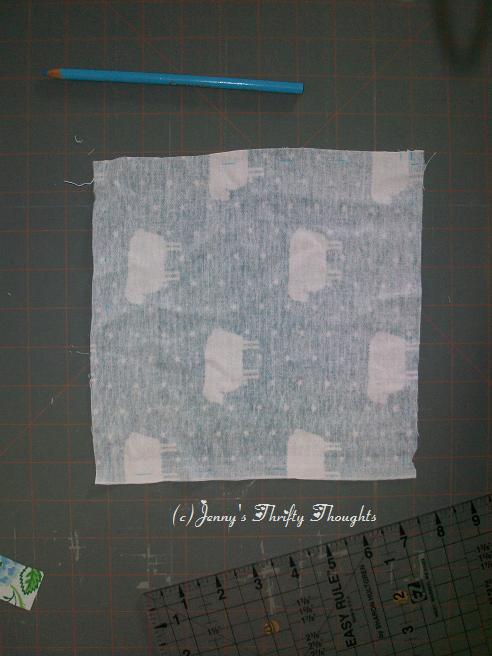
1. Cut each variety of fabric in an 8.5"x8.5" square.


2.  I find it easiest to mark the line I'm going to sew with a colored water-soluble pencil.  You can *almost* see it here:


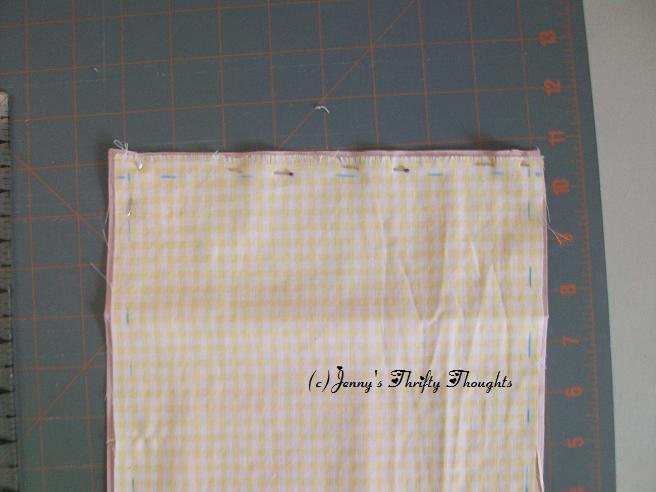
3. Pin two of the fabric squares together, right sides facing in.


4. Sew along the marked line.


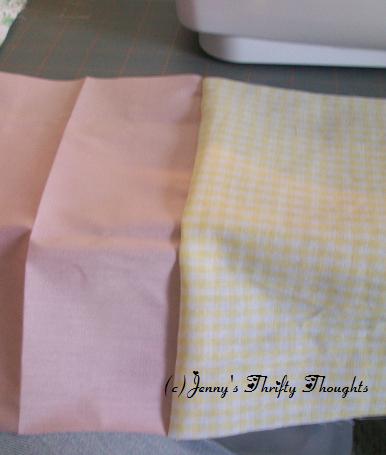
When you have sewn two squares, they should look like this when looking at the right side.


5.  Repeat for all other panels.  Piece them together to form a 6-sided cube, leaving one seam open.

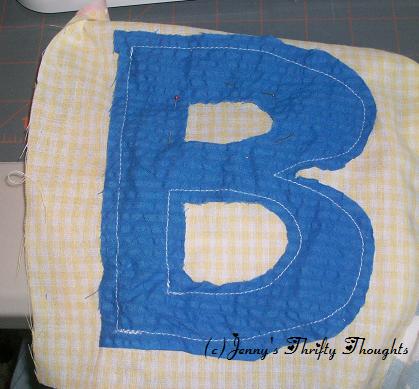
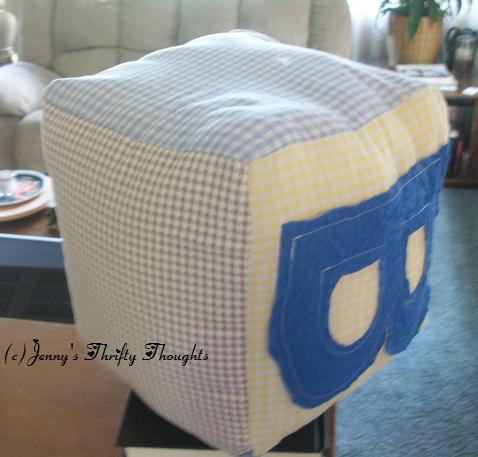
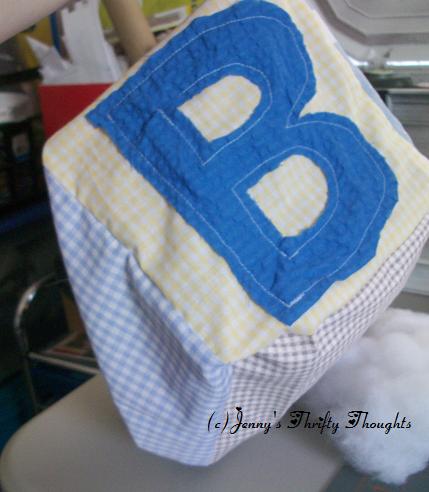
6. Trace and cut out the desired letter from a fun-textured fabric like this one.  I chose "B" because the little girl's name is Brianna. Pin it to one of the panels.

Variation: You could sew a letter onto each panel, or a number, thereby creating a fun learning game!


7. Sew the letter onto the right side of the fabric, leaving 1/4" seam allowance all around.


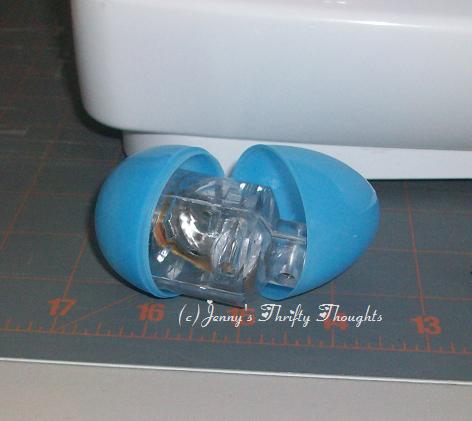
Here is the noise-maker I chose: it's an electronic bouncy thing that came out of one of the toys my dogs destroyed.  I taped it inside a plastic Easter Egg.


8. Sew the last seam 3/4 closed.  


9. Turn cube right-side-out.


10.  Fill half full with poly-fiberfill.  Insert the noise-maker.


11.  Fill the rest of the way up with fiberfill, making sure to tuck it in to all the nooks and crannies.


12. Sew the hole shut by hand (not shown) and you're done!


Her birthday is tomorrow.  I'll let you know how she likes it!

Update: Next to 17 baby dolls that light up and spit and poop and God knows what else, she didn't even look at it.  At least her mom liked it. And I got a collective "awwww" from all the women at the party, lol.

Update 2: Her mom put it up on her dresser so she won't chew on it and get it all nasty. That's kinda missing the whole point...oh well.  

Thursday, May 20, 2010

Easter Postcard in the Middle of May

I recently spent a day at Omaha's Old Market and picked up five deliciously vintage postcards.  This one is an Easter card from 1910.


At the bottom, the sender has dated it March 27, 1910.


The back says, " 1910. With heartiest and best Easter wishes, From Ma & Pa."
It's addressed to a Mr. Scott Evans, but doesn't seem to have been mailed.  

Oh and look at the top right corner: it says Made in Germany. Lovely!

Tuesday, May 18, 2010

Ireland. Because I'm Lazy.

Today is a day in which I feel particularly cranky and lazy.  I had an awesome blog post all lined up about my transformation of a photo album, but I shelved it.  Why, you ask? Because I am too lazy today to write up how I did it, upload all the pics, and then beg people to go see it.  So here's a postcard from Ireland.


One of my college besties went here for a semester abroad.  I think I begged her about 87 times to send me a postcard, because I'm lazy and annoying.

The explanation on the back says the following:
IRELAND: The unique beauty of Ireland's landscape and its rich historic, literary and artistic associations have long made it a favourite resort for tourists.  Encompassing a wealth of natural beauty within its modest dimensions, Ireland boast a landscape which is as much diverse as it is gratifying.  The scenic grandeur is set off by Ireland's position.  Standing in the path of both the prevailing westerly winds of the Atlantic and the warming currents of the Gulf Stream, Ireland enjoys an equable climate which gives the country its unique fresh appearance.

That's a bit much for this image, dontcha think?

Sunday, May 16, 2010

Valentine's Day in May!

I collect postcards of all kinds, and I especially *squee* when I come across vintage Valentines.  I'm in the mood to share these because tomorrow I'm visiting a flea market I've never been to before and I'm excited!  Here are two from my collection found at an antiques store.


Aren't they adorable?

Saturday, May 15, 2010

Easy Binder Spruce-up

I keep all my craft projects in binders. Yeah, I know that's lame, but I'm suuuuuper organizational.  I organize everything.  My husband will attest to that.  So I keep my Christmas craft files in this red binder (because Christmas is red and green, ya know), but it still wasn't Christmasy enough for me to know what's in it without looking at it.  So I jazzed it up for very little.

Supplies:

  • Binder - $1
  • Plastic shopping bag - on hand
  • Clear packing tape - $1
  • Security envelopes - on hand (from the copious amounts of junk mail we all love)
Total Cost: $2 (but free for me because I had everything on hand)
Time: 10 minutes (5 of that was for arranging the letters *just so*)

I took a green shopping bag from Barnes & Noble and fused the two sides together.  Click here for a tutorial on fusing plastic bags (there are literally dozens of tutes out there on this).  I taped it to the front of the binder.  I drew the letters onto the insides of security envelopes and cut them out.  After I arranged them on the bag, I taped them down.  It still wasn't looking Christmasy enough for me.  So I winged it and tried to cut out the shape of an ornament to "hang" on the handle of the bag.  Here it is:

I rather like how it turned out. Don't you?


With another bag I cut and taped a piece to the bridge of the binder.


Now I know exactly what type of files are in that red binder while looking at it on a shelf!

My dogs, however, think this organizational kick is getting to be a bit much.  Hannah is judging me.  Teddy is judging Hannah. Lucy (not pictured) doesn't really care if it doesn't involve food.


Thursday, May 13, 2010

Thrifty Finds Thursday - Bird Frame and a Surprise for Me!

During one of my Goodwill sprees, I found this 8x10 of a sweet little bird.  What's special about this piece is that the picture is painted, yes painted on the inside of the glass.  The background is burlap (puke).  It was only $2.99 So I thought I could give it a new home! Bonus: the frame was in really good shape.


First I turned it over to take off the back.  Dun dun dunnnnnn. Staples from Hell. And obviously improvised (read: too thick) cardboard backing.


I pulled and yanked and yelled at the staples to no avail.  I broke three fingernails.  And not the fake kind; the kind attached to my fingers.  That hurt.  

I tried to pry them up with the edge of my scissors. The evil staples bent my scissors. Seriously.  So I resorted to needle-nosed pliers.  


Alas, it seemed I could not even bend them all up without breaking two of them off.  


Finally, with one side missing staples entirely, and the rest of them loosened enough, I tried to pry out the cardboard.  I have no idea how the person who did this got it in there, but DAMN. Cue fingernails four and five. Crack!  I resorted to less usual measures.


Now I was sweating.  All this for a thrifty Goodwill find? But I would not let it defeat me! (Cue superhero music)


It only budged an inch.  This is a joke, right?

Weeeell, after 38 hours of yanking on the cardboard and swearing like a sailor, I finally got the back off.  Look at the lovely little surprise that waited for me:  


Squeee! Looks like the sun had bleached the burlap, thereby making a negative print from the painting.  I had to frame this.


Isn't it divine? Sigh :).  Ok. Back to the original project.  I had originally intended to make this scrapbook paper the new background:


...but I really liked how it looked all clear with no back.  So I bent down the horrible staples to hold in the glass.


I windex-ed the front, and carefully dabbed the back (as I didn't know what kind of paint it was).  I tried hanging it in several locations, including in front of windows or mirrors, but I decided my bedroom was the perfect place.  


I know you can see the staples and the hanging wire, but I was sweaty and tired, so don't judge me.  I took the above picture with the flash so you could see all the pretty colors.  But the best part was the shadows it cast on the wall behind it.  Here I tried a photo with no flash to show you just how it looks.


Awesome.  And here's the new home for my other little birdy - right by the front door.


All in all, it was a good thrifty find.  Two awesome creations for $2.99.  And a pair of broken scissors. And five broken fingernails.  Oh well.  All in the name of Crafting!


Wednesday, May 12, 2010

This has nothing to do with crafting but it's still AWESOME.

Hello, readers*!  Many of you may not be aware that I grew up in a little place called Sioux City, Iowa.  Well, now you know and you have no excuse not to visit  (For those of you who don't speak Iowanian, it's pronounced "suuuu" city).  I love that no one in the US knew that Sioux City even existed until someone posted this video.

This YouTube video went totally viral last week.  It explains how Sioux City was "built."  I think it's supposed to be some sort of promo for RAGBRAI**.


I love that no one in the US knew that Sioux City even existed until someone posted this video (except Bret Michaels).  I love even more that I'm not in this video.  Poor Bret.  I bet he had no idea he would end up stuck to the end of a cheesy promotional badly-dubbed video about Sewer City***.

By some omnipresent twist of fate, it ended up being recognized in all its glory by Comedy Central's Tosh.0 in "Sioux City Officially Ruins the Internet."

This is f-ing awesome. And the comments! The defenders! The haters!  My favorite thing about this is that my 52-year-old dad was the first to alert me to this gem.  He used to do RAGBRAI every year when I was a youngster.  I remember it well - my dad going off on a bicycle and returning a couple of weeks later.  Every year.  Ah, memories.

<3 Jenny

* By "readers" I mean someone please for the love of God read my blog because I'm DESPERATE!!!
** If you don't know what RAGBRAI is, shame on you.  Everyone knows what RAGBRAI is.  Go back to the rock you've been living under.
*** People call it Sewer City because as you drive in on I-29 you are greeted by the lovely wafting breeze over the CESS POOLS. You get used to the smell after a while.

Monday, May 10, 2010

Mammoth Salted Nuts

I found this tin at a killer yard sale last summer.  It's been sitting on my shelf, waiting to become something fabulous, all this time.  Last week I was painting my toenails - and genius hit me!  Why store my cotton balls in this flimsy plastic bag that never seals right when I can store them in this tin?


Here's a picture of the bottom of the tin.  


It says:
CHEINCO
HOUSEWARES
J.CHEIN & CO
BURLINGTON, N.J.
08016

(At least I think that's what the numbers say. They're a bit tiny.)


~

First I cleaned it out really thoroughly.  It was a bit grody.


Then I cut out a round of heavy fabric for the bottom.  I sprayed the fabric with spray adhesive, and placed it in the tin.  Oops! I guess my "circle" wasn't round enough!


I filled it with cotton balls and admired my "work!"


That's all for now! Thanks for reading!

[Edit: I was curious as to how old this piece was, and who made it, so I did a little research.  You can read all about J. Chein & Company and the man himself, Julius Chein.  I couldn't, however, find out much about the Mammoth Salted Nuts (snort) other than people selling the tins themselves here.]

Sunday, May 9, 2010

Mother's Day...

...for me is another day to feel that empty hole in my heart.  Rest in peace, Emma Elizabeth and Noah Asher.  Mommy loves you.

Saturday, May 8, 2010

Pencil Caddy from Tampon Box

I get those kind of tampons that have the 3 different "strengths" in them, and already come with perfect dividers.  I thought to myself, "Self, I know I can use this somehow!"  So I decided to wrap it in pretty paper, slap on some cute stickers, and fill it with pencils and pens.  Voila!

Time: 10 min.
Cost:  Free

Supplies:
Cardboard box: On hand
Colored paper: On hand
Stickers: On hand

View from the top:


And the sides:


I really liked the torn paper look.


I held it all together with staples, but you could use mod podge or any other glue if you so desired.  I also used really bright colors, but you could do this all classy-like with antiqued newspapers and flowers and such.  Hmmm... I may have to do that....